Building, Packaging, Deploying, and Running the Application
To build the Duke's Bank application, you must have installed the tutorial bundle as described in About the Examples. When you install the bundle, the Duke's Bank application files are located in the
<INSTALL>/j2eetutorial14/examples/bank/directory:
/bank- packaged J2EE application containing the enterprise beans and web and application clients
/provided-jars
/sql- database scripts
/src/com- component classes/sun/ebank/appclient
/sun/ebank/ejb
/sun/ebank/util
/sun/ebank/web/web- JSP pages, imagesAfter you compile the source code, the resulting files will reside in the
<INSTALL>/j2eetutorial14/examples/bank/build/directory.Setting Up the Servers
Before you can package, deploy, and run the example, you must first set up the Derby database server with customer and account data, and you must add some resources to the Application Server.
Starting the Application Server
Before you can start this tutorial, the Application Server must be running. For information on starting the Application Server, see Starting and Stopping the Application Server.
Creating the Bank Database
You create and enter data into the appropriate tables so that the enterprise beans have something to read from and write to the database.
Note: Application Server 8.2 includes a copy of the open source Derby database server. Application Server 8.0/ 8.1 includes the PointBase database server. If you are using Application Server 8.0/8.1, either follow the instructions in the J2EE Tutorial at
http://java.sun.com/j2ee/1.4/docs/tutorial-update6/doc/index.htmlthat works with Application Server 8.0/8.1 or upgrade to Application Server 8.2 (seehttp://java.sun.com/j2ee/1.4/download.html#appservto download).
To create and populate the database tables, follow these steps:
- In a terminal window or command prompt, go to the
<INSTALL>/j2eetutorial14/examples/bank/directory.- Execute the command
asantcreate-db_common. This asant task executes the SQL commands contained in<INSTALL>/j2eetutorial14/examples/bank/sql/create-table.sql. The SQL commands delete any existing tables, create new tables, and insert data.Capturing the Database Schema
After you create and populate the tables, you capture the structure of the tables into a schema file used to map the table data to enterprise bean fields and relationships. To capture the schema, follow these steps:
- In a terminal window or command prompt, go to the
<INSTALL>/j2eetutorial14/examples/bank/directory.- Execute the following command:
asant capture-db-schemaThis task invokes the
capture-schemacommand and saves the resulting schema file in<INSTALL>/j2eetutorial14/examples/bank/build/dukesbank.dbschema.Creating the JDBC Data Source
The Duke's Bank enterprise beans reference the database having the JNDI name
jdbc/BankDB. That JNDI name must be mapped to a JDBC data source in the Application Server. You create the data source using the Admin Console following the procedures described in Creating a Data Source. When you create the JDBC data source, name itjdbc/BankDBand map it toDerbyPool.Adding Users and Groups to the File Realm
To enable the Application Server to determine which users can access enterprise bean methods and resources in the web client, add users and groups to the server's file security realm using the Admin Console following the procedures described in Managing Users. Add the users and groups listed in Table 36-3.
200j2eebankCustomerbankadminj2eebankAdmin
Compiling the Duke's Bank Application Code
To compile the enterprise beans, application client, and web client, go to the
<INSTALL>/j2eetutorial14/examples/bank/directory of the tutorial distribution and execute the commandasantbuild.Packaging and Deploying the Duke's Bank Application
The instructions that follow for packaging and deploying Duke's Bank assume that you are familiar with the deploytool procedures for packaging enterprise beans, application clients, and web applications described in previous chapters of the tutorial. If after following these procedures you have trouble deploying or running the application, you can use the EAR provided in
<INSTALL>/j2eetutorial14/examples/bank/provided-jars/to run the example.Packaging the Enterprise Beans
- Create an EJB JAR module named
DukesBankEJBJARin<INSTALL>/j2eetutorial14/examples/bank/.- Add the
ejbandutilpackages under<INSTALL>/j2eetutorial14/examples/bank/build/com/sun/ebank/, and dukesbank.dbschema in<INSTALL>/j2eetutorial14/examples/bank/build/.- Set up the entity beans:
- Set up each CMP 2.0 entity bean listed in the following tables using the Enterprise Bean wizard:
- Set up the entity bean relationships according to Table 36-8:
- In the Sun-specific Settings->CMP Database dialog:
- Set the EJB-QL finder queries according to Table 36-9. To set the finder queries, select the bean in the tree, select the Entity tab, then select Find/Select Queries.
- Set the Transaction Attributes for the
NextIdBean.getNextIdmethod to Requires New. To do this, select theNextIdBeanin the tree, select the Transactions page, and then change the Transaction Attribute for thegetNextIdmethod.- Invoke the Enterprise Bean Wizard for each of the stateful session beans in Table 36-10.
- Add EJB references from the session beans to the local entity beans listed in the following tables.
- Set the Transaction Management of the session beans to Container-Managed.
- Save the module.
Packaging the Application Client
- Invoke the Application Client wizard.
- Create an application client module named
DukesBankACJARin<INSTALL>/j2eetutorial14/examples/bank/.- Add the
appclient,util, andejb/exceptionpackages and theejb/*/*Controller*home and remote interfaces (AccountController,AccountControllerHome,CustomerController,CustomerControllerHome,TxController,TxControllerHome) under<INSTALL>/j2eetutorial14/examples/bank/build/com/sun/ebank/to the JAR.- Select
appclient.BankAdminas the application client main class.- Add EJB references to the session beans listed in Table 36-14.
Table 36-14 EJB References to Session BeansPackaging the Web Client
- Create a
newweb component using the Web Component wizard. On the first page of the wizad, create a new web module namedDukesBankWARin<INSTALL>/j2eetutorial14/examples/bank/.- Add the
Dispatcherservlet web component in<INSTALL>/j2eetutorial14/examples/bank/build/com/sun/ebank/web/.- On the Choose Component Type page, select Servlet.
- On the Component General Properties page, select the
Dispatcherservlet class.- Select Finish to close the wizard.
- With
DukesBankWarselected, add content to the web module.
- Add the
web,util, andejb/exceptionpackages and theejb/*/*Controller*home and remote interfaces (AccountController,AccountControllerHome,CustomerController,CustomerControllerHome,TxController,TxControllerHome) under<INSTALL>/j2eetutorial14/examples/bank/build/com/sun/ebankto the module.- Add the
templatedirectory, all the JSP pages, theWebMessages*.propertiesfiles andtutorial-template.tldunder<INSTALL>/j2eetutorial14/examples/bank/build/to the module.- In the web module contents editor, drag the files
WebMessages*.propertiesfrom the context root toWEB-INF/classes.- Set the context root to
/bank.- Add the
/accountHist,/accountList,/atm,/atmAck,/main, /transferAck,/transferFunds, and/logoffaliases to theDispatchercomponent.- Add EJB references to the session beans listed in Table 36-15.
- Select the JSP tab to add a JSP property group named
bank. The property group applies to the URL pattern*.jsp. Add the include prelude/template/prelude.jspf.- Select the Context tab to add a context parameter named
javax.servlet.jsp.jstl.fmt.localizationContextand valueWebMessages.- Select the Security tab to add a security constraint.
- Select Form Based as the user authentication method. Select the Settings button to set the authentication settings as follows:
filefor the realm name,/logon.jspfor the login page, and/logonError.jspfor the error page.- Add a security constraint and a web resource collection. Use the default names provided by
deploytool.- Select Edit Collections to add the URL Patterns
/main,/accountList,/accountHist,/atm,/atmAck,/transferFunds, and/transferAckto the web resource collection. Select theGETandPOSTHTTP methods.- Select Edit Roles to add the authorized role
bankCustomer.- Save the module.
Packaging and Deploying the Application
- Create a J2EE application named
DukesBankAppin<INSTALL>/j2eetutorial14/examples/bank/.- Select Add to Application from the File menu to add the
DukesBankACJARapplication client module toDukesBankApp.- Select Add to Application from the File menu to add the
DukesBankEJBJAREJB module toDukesBankApp.- Select Add to Application from the File menu to add the
DukesBankWARweb module toDukesBankApp.- Select the Roles tab to add the security roles
bankAdminandbankCustomer.- Add the following security settings for the enterprise beans.
AccountControllerBean: In the Security tab, restrict access to users in thebankAdminsecurity role for the methodsremoveCustomerFromAccount,removeAccount,createAccount, andaddCustomerToAccount. In the General tab, click the Sun-specific Settings button, and then click the IOR button in the General frame. In the As Context frame, set Required totrue, and the realm tofile.CustomerControllerBean: In the Security tab, restrict access to users in thebankAdminsecurity role for the methodsgetCustomersOfAccount,createCustomer,getCustomersOfLastName,setName,removeCustomer, andsetAddress. In the General tab, click the Sun-specific Settings button, and then click the IOR button in the General frame. In the As Context frame, set Required totrue, and the realm tofile.TxControllerBean: In the Security tab, restrict access to users in thebankCustomersecurity role for the methodsgetTxsOfAccount,makeCharge,deposit,transferFunds,withdraw, andmakePayment.- Start the Application Server.
- From the General tab of DukesBankApp, select Sun-specific Settings to map the
bankCustomerrole to thebankCustomergroup and to map thebankAdminrole to thebankAdmingroup.- Save the application.
- Deploy the application. In the Deploy
DukesBankAppdialog box, select the Return Client Jar checkbox.After you have packaged all the modules,
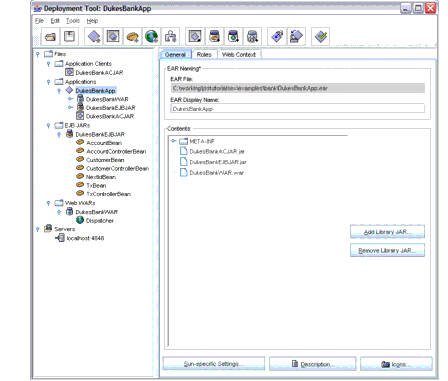
deploytoolshould look like Figure 36-8.

Figure 36-8 Duke's Bank Modules and Components
Reviewing JNDI Names
With
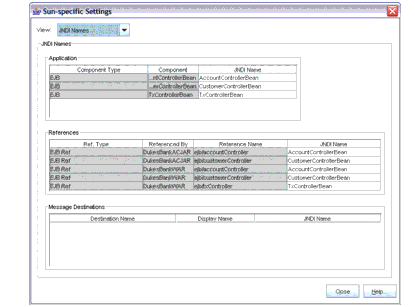
DukesBankAppselected, click theSun-specific Settings button on the General tab to view the JNDI Names. The JNDI Name column is shown in Figure 36-9. The order may be a little different in your own environment.

Figure 36-9 Duke's Bank JNDI Names
A JNDI name is the name the Application Server uses to look up enterprise beans and resources. When you look up an enterprise bean, you supply statements similar to those shown in the following code.
try {
  customerControllerHome =
    EJBGetter.getCustomerControllerHome();
  customer = customerControllerHome.create();
} catch (Exception namingException) {
  namingException.printStackTrace();
}

public static CustomerControllerHome
  getCustomerControllerHome() throws   NamingException {
  InitialContext initial = new InitialContext();
  Object objref = initial.lookup(
    CodedNames.CUSTOMER_CONTROLLER_EJBHOME);
The lookup takes place in the third line of code, in which the
getCustomerControllerHomemethod ofcom.sun.ebank.utilEJBGetteris called.EJBGetteris a utility class that retrieves a coded JNDI name fromcom.sun.ebank.util.CodedNames.In this example, the application client is looking up the coded name for the
CustomerControllerremote interface.BankAdmin(the display name for the main class of the application client) referencesejb/customerController, which is the coded name defined inCodedNamesfor theCustomerControllerremote interface.The JNDI name is stored in the J2EE application deployment descriptor, and the Application Server uses it to look up the
CustomerControllerBeanbean. In Figure 36-9 you see thatCustomerControllerBeanis mapped to the same JNDI name as isejb/customerController. It does not matter what the JNDI name is, as long as it is the same name for the remote interface lookup as you use for its corresponding bean. So, looking at the table, you can say that the application client (BankAdmin) looks up theCustomerControllerremote interface, which uses the JNDI name ofCustomerControllerBean, and the Application Server uses theCustomerControllerBeanJNDI name to find the correspondingCustomerControllerBeanobject.The other rows in the table have the mappings for the other enterprise beans. All of these beans are stored in the JAR file you added to the J2EE application during assembly. Their implementations have coded names for looking up either other enterprise beans or the database driver.