The Example JSP Pages
This chapter describes the tasks involved in defining simple tags. We illustrate the tasks using excerpts from the JSP version of the Duke's Bookstore application discussed in The Example JSP Pages, rewritten here to take advantage of several custom tags:
The last section in the chapter, Examples, describes several tags in detail: a simple iteration tag and the set of tags in the
tutorial-templatetag library.The
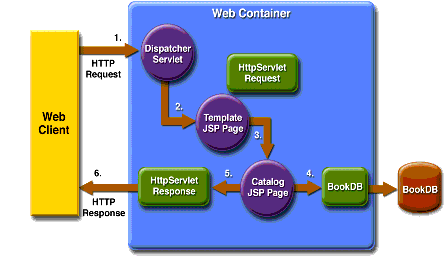
tutorial-templatetag library defines a set of tags for creating an application template. The template is a JSP page that has placeholders for the parts that need to change with each screen. Each of these placeholders is referred to as a parameter of the template. For example, a simple template might include a title parameter for the top of the generated screen and a body parameter to refer to a JSP page for the custom content of the screen. The template is created using a set of nested tags--definition,screen, andparameter--that are used to build a table of screen definitions for Duke's Bookstore. Aninserttag to insert parameters from the table into the screen.Figure 15-1 shows the flow of a request through the following Duke's Bookstore web components:
template.jsp, which determines the structure of each screen. It uses theinserttag to compose a screen from subcomponents.screendefinitions.jsp, which defines the subcomponents used by each screen. All screens have the same banner but different title and body content (specified by the JSP Pages column in Table 12-1).Dispatcher, a servlet, which processes requests and forwards totemplate.jsp.

Figure 15-1 Request Flow through Duke's Bookstore Components
The source code for the Duke's Bookstore application is located in the
<INSTALL>/j2eetutorial14/examples/web/bookstore3/directory created when you unzip the tutorial bundle (see About the Examples). A samplebookstore3.waris provided in<INSTALL>/j2eetutorial14/examples/web/provided-wars/. To build the example, follow these steps:
- Build and package the bookstore common files as described in Duke's Bookstore Examples.
- In a terminal window, go to
<INSTALL>/j2eetutorial14/examples/bookstore3/.- Run
asantbuild. This target will spawn any necessary compilations and will copy files to the<INSTALL>/j2eetutorial14/examples/web/bookstore3/build/directory.- Start the Application Server.
- Perform all the operations described in Accessing Databases from Web Applications.
To package and deploy the example using
asant, follow these steps:To learn how to configure the example, use
deploytoolto package and deploy it:
- Start
deploytool.- Create a web application called
bookstore3. Select FileNew
Web Component.
- In the New Web Component wizard:
- Select the Create New Stand-Alone WAR Module radio button.
- In the WAR File field, enter
<INSTALL>/j2eetutorial14/examples/web/bookstore3/bookstore3.war. The WAR Display Name field will showbookstore3.- In the Context Root field, enter
/bookstore3.- Click Edit Contents.
- In the Edit Contents dialog box, navigate to
<INSTALL>/j2eetutorial14/examples/web/bookstore3/build/. Select the JSP pagesbookstore.jsp,bookdetails.jsp,bookcatalog.jsp,bookshowcart.jsp,bookcashier.jsp,bookreceipt.jsp, andbookordererror.jsp,the tag filescatalog.tagandshipDate.tag, the custom TLD,tutorial-template.tld, and thedispatcher,database,listeners, andtemplatedirectories and click Add. Click OK.- Add the shared bookstore library. Navigate to
<INSTALL>/j2eetutorial14/examples/web/bookstore/dist/. Selectbookstore.jar, and click Add. Click OK.- Click Next.
- Select the Servlet radio button, then .
- Click Next.
- Select
dispatcher.Dispatcherfrom the Servlet class combo box.- Click Finish.
- Add the listener class
listeners.ContextListener(described in Handling Servlet Life-Cycle Events).- Add the aliases.
- Add the context parameter that specifies the JSTL resource bundle base name.
- Set the prelude for all JSP pages.
- Add a resource reference for the database.
- Deploy the application.
To run the example, open the bookstore URL
http://localhost:8080/bookstore3/bookstore.See Troubleshooting for help with diagnosing common problems.